
Part 1 of a two-part series. Part 2 builds the same solution as a low-code Azure Logic App.
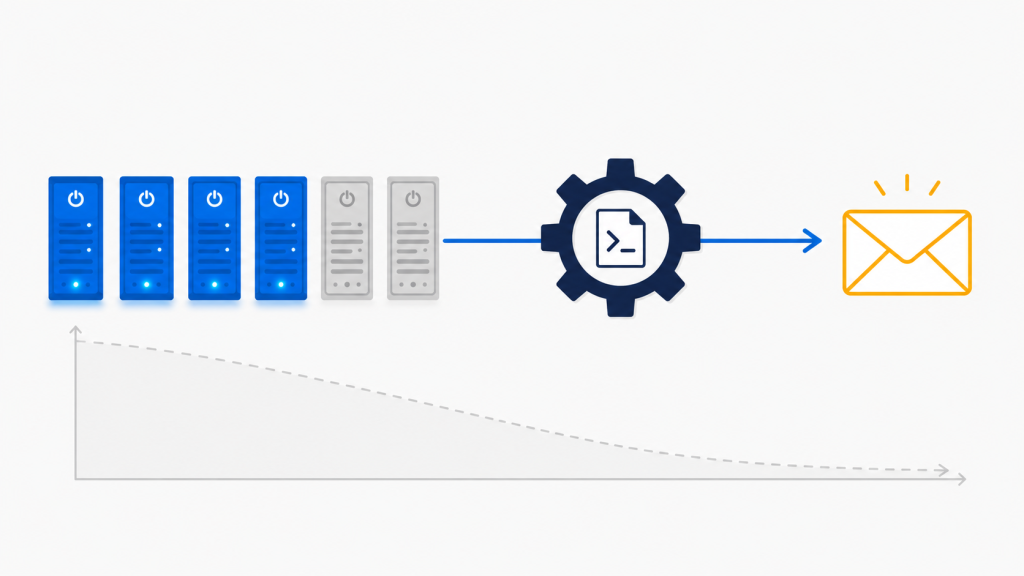
Here’s a number that should bother you: a dev/test VM that nobody turns off runs 168 hours a week. Your team uses it for about 45 of them.
You’re paying for 123 hours of nothing. Multiply that by a dozen VMs and you’ve got a line item that quietly rivals a headcount.
The fix is boring and it works: shut them down every night, automatically, and send somebody an email so it’s not happening in a black hole. Couple hours of setup, permanent savings, and, importantly, an audit trail that keeps your security team happy.
In this post we’re building the whole thing from scratch – well at least from an empty resource group. Managed identity, least-privilege RBAC, a real runbook with error handling, Azure Communication Services (ACS) for the email, and a schedule that survives daylight saving time. No stored credentials anywhere.
Choose Your Path
Every step below is written twice — once for the portal, once for the command line. Pick a lane and stay in it; both are complete, start to finish.
- Portal person? Read the Portal block in each step and skip the code. You’ll never hit a wall where the only instruction is a script.
- PowerShell or CLI person? Skip straight to the PowerShell and Azure CLI blocks. Steps 4 and 5 are the two places where the portal is genuinely the faster tool, and I say so rather than pretending otherwise.
- Hybrid, like most of us? Click through the one-time setup, script the parts you’ll repeat. That’s Steps 1 through 5 in the portal and Steps 6 through 9 in code, if you want my actual workflow.
What We’re Building
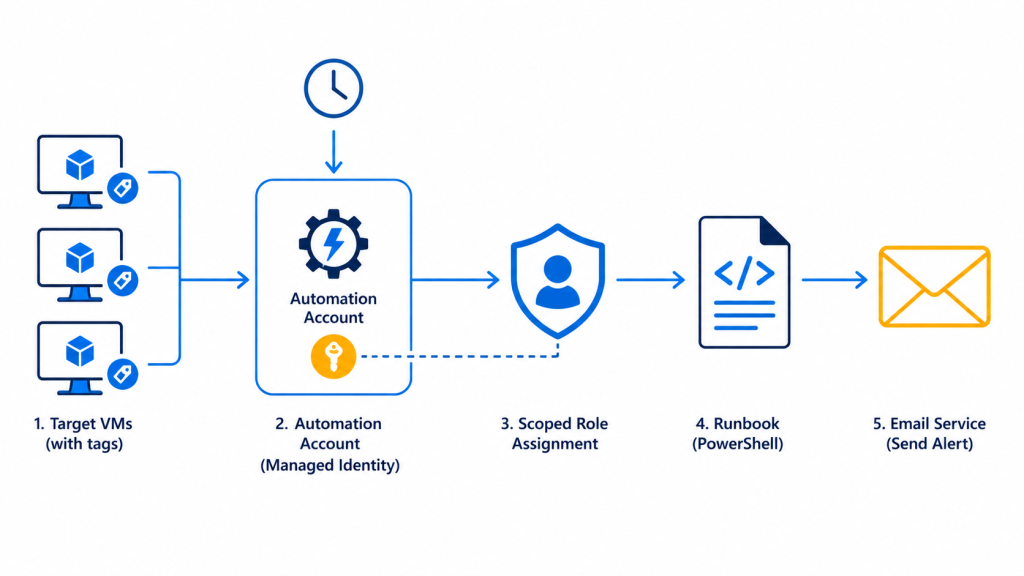
Five pieces, and each one has exactly one job:
- Tags on your VMs decide what gets shut down. This is your control plane — adding a VM to the shutdown group is a tag edit, not a code change.
- An Automation Account with a system-assigned managed identity runs the code.
- An RBAC role assignment lets that identity stop VMs and nothing else.
- A PowerShell runbook finds the tagged VMs, deallocates them, and reports.
- Azure Communication Services sends the summary email.
- A schedule fires the runbook nightly at midnight Eastern US time.
Here’s the environment. Swap in your own names and data.
| Component | Name |
| Resource group | azi-acs-test-eastus-rg |
| Automation Account | azi-aa-vmops-test-eastus |
| Runbook | Stop-TaggedVMs |
| Schedule | Nightly-VM-Shutdown-0000-ET |
| Communication Service | azi-acs-email-test-eastus |
| Sender domain | somedomainsomewhere.com |
| Subscription ID | 12345678-9000-0000-0000-000000000000 |
Before You Start
Check these now rather than discovering them accidentally later:
Permissions. Contributor on the resource group covers most of this. Creating the role assignment in Step 3 also needs User Access Administrator or Owner; a permission plenty of IT engineers don’t have. If that’s you, line up your Azure cloud admin for Step 3; it’s the only step that requires them, and it takes about ninety seconds of their time.
Tooling, if you’re scripting. Azure PowerShell needs Az.Accounts, Az.Compute, Az.Automation, and Az.Resources. Install-Module Az covers all four. Azure CLI needs version 2.75.0 or higher for the automation extension, which installs itself on first use. Neither matters if you’re staying in the portal.
A test VM you’re allowed to break. Do not make your first run of this in a production fleet. Tag one non-critical VM, prove the whole chain works end to end, then expand the tag.
About twenty minutes of DNS patience if you’re using a custom sending domain that’s not already set up for Step 4. Azure-managed domains skip this entirely. If you’re custom domain’s already setup, you’re good to go.
Step 1 — Tag the VMs
Do this first. Tagging is what makes the whole solution easy-peazy later.
Portal. Open the resource group, tick the checkboxes next to the VMs you want in the shutdown group, and click Assign tags on the command bar. Enter AutoShutdown as the name and True as the value, then Save. Bulk-assigning from the resource group list is far faster than visiting each VM’s Tags blade one at a time, and it’s additive — existing tags stay put.
To review what you’ve tagged, open All resources, click Add filter → Tag, and select AutoShutdown = True.
PowerShell.
Connect-AzAccount
Set-AzContext -SubscriptionId '00000000-0000-0000-0000-000000000000'

$vm = Get-AzVM -ResourceGroupName 'acs-eng-test-eastus-rg' -Name 'vm-dev-web-01'
Update-AzTag -ResourceId $vm.Id -Tag @{ AutoShutdown = 'True' } -Operation Merge

Get-AzResource -TagName 'AutoShutdown' -TagValue 'True' `
    -ResourceType 'Microsoft.Compute/virtualMachines' |
    Select-Object Name, ResourceGroupName
-Operation Merge matters. Replace will wipe every other tag on the resource, including the ones your cost-allocation reports depend on. I have seen this ruin a month of chargeback data.
Azure CLI.
az resource tag --tags AutoShutdown=True --is-incremental \
  --resource-group acs-eng-test-eastus-rg \
  --name vm-dev-web-01 \
  --resource-type Microsoft.Compute/virtualMachines
–is-incremental is the CLI’s equivalent of Merge. Leave it off and you overwrite every tag on the VM.
Whichever route you took, read the resulting list out loud. Anything on it that shouldn’t be there is a production outage waiting for midnight.
If tags aren’t your thing, the runbook below also accepts a CSV — a file like TestInputFile.csv with a VMName,ResourceGroupName header works fine. Tags scale better, but CSV is easier to get signed off in change-averse shops.
Step 2 — Create the Automation Account
Portal. Search Automation Accounts → Create. Name it aa-vmops-eng-test-eastus, select acs-eng-test-eastus-rg, pick your region. On the Advanced tab confirm System assigned managed identity is enabled — it is by default, just don’t turn it off. Create.
Once it deploys, open Settings → Identity and copy the Object (principal) ID. You need it in Step 3.
PowerShell.
New-AzAutomationAccount -ResourceGroupName 'acs-eng-test-eastus-rg' `
    -Name 'aa-vmops-eng-test-eastus' `
    -Location 'EastUS' `
    -AssignSystemIdentity

$aa = Get-AzAutomationAccount -ResourceGroupName 'acs-eng-test-eastus-rg' `
    -Name 'aa-vmops-eng-test-eastus'
$principalId = $aa.Identity.PrincipalId
Azure CLI.
az automation account create \
  --resource-group acs-eng-test-eastus-rg \
  --name aa-vmops-eng-test-eastus \
  --location eastus \
  --sku Basic

PRINCIPAL=$(az automation account show \
  --resource-group acs-eng-test-eastus-rg \
  --name aa-vmops-eng-test-eastus \
  --query identity.principalId -o tsv)
A system-assigned identity is the right default here. It’s created with the Automation Account, deleted with it, and can’t be accidentally reused by another resource. Reach for a user-assigned identity only when several automations need to share one permission set.
Step 3 — Grant Permissions (The Least-Privilege Way)
The lazy move is Contributor on the subscription. Don’t. You’re building an identity that runs unattended at midnight with nobody watching — give it the smallest possible blast radius.
Virtual Machine Contributor scoped to the resource group is the reasonable default and what most shops land on. But it can also delete VMs, and your shutdown automation has no business doing that. If your security review has teeth, build a custom role.
Portal — the quick version. Open the resource group → Access control (IAM) → Add → Add role assignment. Search for Virtual Machine Contributor, select it, click Next. Set Assign access to to Managed identity, click Select members, choose Automation Account, and pick aa-vmops-eng-test-eastus. Review and assign.
Portal — the custom role version. Same IAM blade → Add → Add custom role. Name it VM Shutdown Operator. On the Baseline permissions tab choose Start from JSON and upload the file below — or choose Start from scratch and add the four actions by hand on the Permissions tab. Confirm the Assignable scopes tab shows your resource group, then create. Assign it exactly like the built-in role above.
{
  "Name": "VM Shutdown Operator",
  "Description": "Read and deallocate virtual machines. No create or delete.",
  "Actions": [
    "Microsoft.Compute/virtualMachines/read",
    "Microsoft.Compute/virtualMachines/deallocate/action",
    "Microsoft.Compute/virtualMachines/instanceView/read",
    "Microsoft.Resources/subscriptions/resourceGroups/read"
  ],
  "NotActions": [],
  "AssignableScopes": [
    "/subscriptions/00000000-0000-0000-0000-000000000000/resourceGroups/acs-eng-test-eastus-rg"
  ]
}
PowerShell.
New-AzRoleDefinition -InputFile '.\vm-shutdown-operator.json'

New-AzRoleAssignment -ObjectId $principalId `
    -RoleDefinitionName 'VM Shutdown Operator' `
    -ResourceGroupName 'acs-eng-test-eastus-rg'
Azure CLI.
az role definition create --role-definition @vm-shutdown-operator.json

az role assignment create \
  --assignee-object-id "$PRINCIPAL" \
  --assignee-principal-type ServicePrincipal \
  --role "VM Shutdown Operator" \
  --resource-group acs-eng-test-eastus-rg
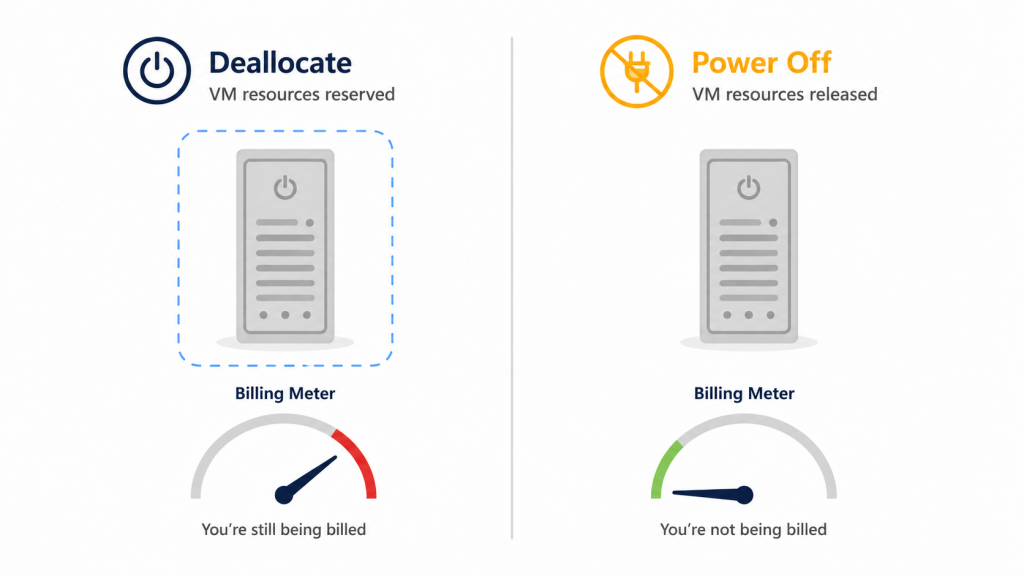
Note deallocate, not powerOff. Power off stops the OS but keeps the compute reserved — you keep paying. Deallocate releases the hardware and stops the meter. That distinction is the entire point of this exercise, and it’s the single most common mistake in homegrown shutdown scripts.
Give the assignment five minutes before you test anything. RBAC propagation delay is the classic “but I did grant it” moment.
Step 4 — Stand Up Azure Communication Services Email
Straight talk: do this one in the portal. Domain verification is an interactive flow with DNS records you need to copy out and paste into your registrar, and scripting it buys you nothing on a one-time setup. This is the step where clicking genuinely wins.
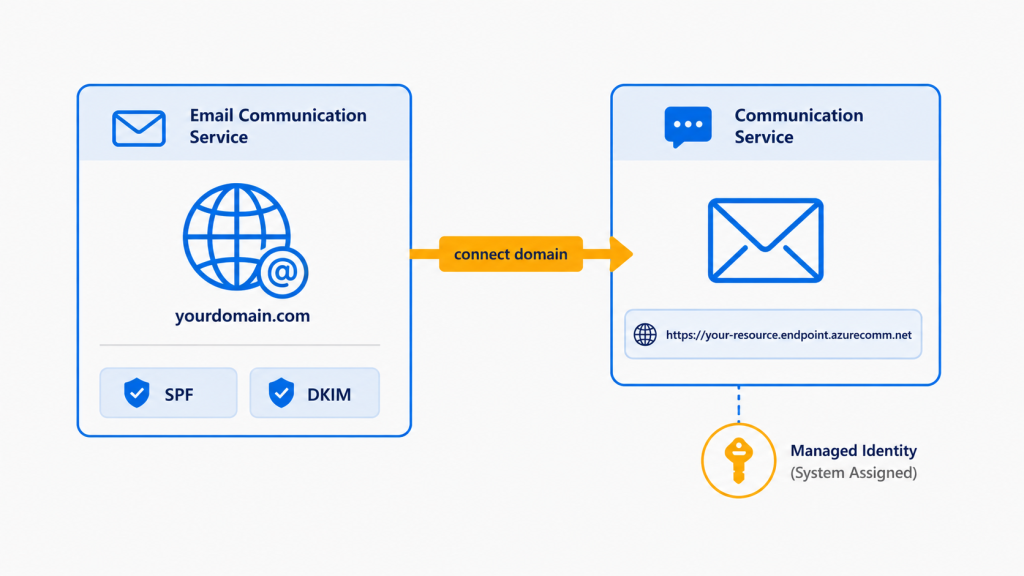
It’s also the fiddliest part, mostly because it’s two resources that people assume are one.
- Create an Email Communication Service resource. This owns the sending domain.
- In it, add a domain. Two choices:
- Azure Managed Domain — one click, no DNS, gives you a sender like Do********@****************mm.net. Rate-limited and unbranded, but working in five minutes. Perfect for getting this running today.
- Custom domain — somedomainsomewhere.com, requires TXT, SPF, and DKIM records at your DNS provider and a wait for verification. This is what you want in production.
- Create a separate Communication Service resource, acs-email-eng-test-eastus.
- In the Communication Service, go to Email → Domains → Connect domain and attach the domain from step 2. Miss this and every send fails with a domain-not-linked error that reads like a permissions problem. It isn’t.
- Copy the endpoint from Keys — something like https://acs-email-eng-test-eastus.unitedstates.communication.azure.com.
Now grant the Automation Account’s identity permission to send. Skip the connection string entirely — we’re using Entra ID.
Portal. Open the Communication Service → Access control (IAM) → Add role assignment → Communication and Email Service Owner → Managed identity → Automation Account → aa-vmops-eng-test-eastus.
PowerShell.
$acs = Get-AzResource -ResourceGroupName 'acs-eng-test-eastus-rg' `
    -Name 'acs-email-eng-test-eastus' `
    -ResourceType 'Microsoft.Communication/CommunicationServices'

New-AzRoleAssignment -ObjectId $principalId `
    -RoleDefinitionName 'Communication and Email Service Owner' `
    -Scope $acs.ResourceId
If that role is broader than you’d like, a custom role carrying just Microsoft.Communication/EmailServices/Send/action scoped to the ACS resource is the tighter option.
Step 5 — Runtime Environment and the Module Nobody Expects
Azure Automation runs runbooks inside Runtime Environments, and PowerShell 7.4 is only available through them.
Portal. Automation Account → Runtime Environments → Create. Name it pwsh74-vmops, set Language to PowerShell and Runtime version to 7.4. On the Packages tab you’ll see Az and Azure CLI already present.
Now the part that catches everyone. Az.Communication is not included. Click + Add from gallery, search Az.Communication, add it, and give it a few minutes to import.
Skip this and your runbook will pass its syntax check, run fine right up to the email step, and then fail with a command-not-found error at 12:00 AM. Nobody sees it until morning.
Command line. Runtime Environment management is portal-and-REST for now — there’s no first-class az automation runtime-environment command group yet. If you need this in a pipeline, deploy it with an ARM template against Microsoft.Automation/automationAccounts/runtimeEnvironments. For a one-time build, use the portal and move on.
Step 6 — The Runbook
Portal. Runbooks → Create a runbook. Name Stop-TaggedVMs, type PowerShell, runtime environment pwsh74-vmops. Paste the script below into the editor, then Save.
PowerShell. Save the script locally as Stop-TaggedVMs.ps1 and import it — much better if you keep runbooks in Git, which you should:
Import-AzAutomationRunbook -ResourceGroupName 'acs-eng-test-eastus-rg' `
    -AutomationAccountName 'aa-vmops-eng-test-eastus' `
    -Path '.\Stop-TaggedVMs.ps1' `
    -Type PowerShell -Name 'Stop-TaggedVMs' -Force
Here’s the runbook itself.
<#
.SYNOPSIS
    Deallocates Azure VMs carrying a specified tag and emails a summary.

.DESCRIPTION
    Intended to run as a scheduled Azure Automation runbook. Authenticates
    with the Automation Account's system-assigned managed identity, finds
    every VM matching the supplied tag, deallocates any that are running,
    and sends an HTML summary through Azure Communication Services.

    Deallocate is used rather than power off so that compute billing stops.

.PARAMETER ResourceGroupName
    Resource group to search. Omit to search the whole subscription.

.PARAMETER TagName
    Tag key identifying shutdown candidates. Default: AutoShutdown.

.PARAMETER TagValue
    Tag value identifying shutdown candidates. Default: True.

.PARAMETER RecipientAddress
    Email address receiving the summary.

.PARAMETER WhatIfOnly
    Report what would be stopped without stopping anything.

.NOTES
    Author  : John O'Neill Sr.
    Company : Azure Innovators
    Version : 1.0.0
    Requires: PowerShell 7.4 Runtime Environment
              Az.Accounts, Az.Compute, Az.Communication
    Prereqs : System-assigned managed identity with VM deallocate rights
              and Communication and Email Service Owner on the ACS resource.
#>

param(
    [string] $ResourceGroupName = 'acs-eng-test-eastus-rg',
    [string] $TagName           = 'AutoShutdown',
    [string] $TagValue          = 'True',
    [string] $RecipientAddress  = 'cl******@*****************re.com',
    [bool]   $WhatIfOnly        = $false
)

$ErrorActionPreference = 'Stop'

$acsEndpoint = 'https://acs-email-eng-test-eastus.unitedstates.communication.azure.com'
$senderAddress = 'Do********@*****************re.com'
$timeZoneId  = 'Eastern Standard Time'

$stopped = [System.Collections.Generic.List[string]]::new()
$skipped = [System.Collections.Generic.List[string]]::new()
$failed  = [System.Collections.Generic.List[string]]::new()

try {
    Write-Output 'Authenticating with managed identity.'
    Connect-AzAccount -Identity | Out-Null

    $vms = Get-AzVM -ResourceGroupName $ResourceGroupName -Status |
        Where-Object { $_.Tags[$TagName] -eq $TagValue }

    Write-Output "Found $($vms.Count) tagged VM(s)."

    foreach ($vm in $vms) {
        $power = ($vm.Statuses |
            Where-Object Code -like 'PowerState/*').Code

        if ($power -ne 'PowerState/running') {
            Write-Output "$($vm.Name): already $power, skipping."
            $skipped.Add($vm.Name)
            continue
        }

        if ($WhatIfOnly) {
            Write-Output "$($vm.Name): WHATIF - would deallocate."
            $stopped.Add("$($vm.Name) (simulated)")
            continue
        }

        try {
            Write-Output "$($vm.Name): deallocating."
            Stop-AzVM -ResourceGroupName $vm.ResourceGroupName `
                      -Name $vm.Name -Force | Out-Null
            $stopped.Add($vm.Name)
        }
        catch {
            Write-Warning "$($vm.Name): failed - $($_.Exception.Message)"
            $failed.Add("$($vm.Name): $($_.Exception.Message)")
        }
    }
}
catch {
    Write-Error "Fatal error before shutdown loop: $($_.Exception.Message)"
    throw
}
That’s the work. Now the report — and note that the timestamp is generated, never hardcoded. Change the schedule later and this email keeps telling the truth:
$runTime = [System.TimeZoneInfo]::ConvertTimeFromUtc(
    (Get-Date).ToUniversalTime(),
    [System.TimeZoneInfo]::FindSystemTimeZoneById($timeZoneId))

$stamp = $runTime.ToString('MMMM d, yyyy \a\t h:mm tt') + ' Eastern'

function Format-Section {
    param([string] $Heading, [System.Collections.Generic.List[string]] $Items)
    if ($Items.Count -eq 0) { return '' }
    $rows = ($Items | ForEach-Object { "<li>$_</li>" }) -join ''
    return "<h3>$Heading ($($Items.Count))</h3><ul>$rows</ul>"
}

$body  = "<p>Nightly VM shutdown completed at <strong>$stamp</strong>.</p>"
$body += Format-Section -Heading 'Deallocated'  -Items $stopped
$body += Format-Section -Heading 'Already off'  -Items $skipped
$body += Format-Section -Heading 'Failed'       -Items $failed
$body += "<p>Resource group: $ResourceGroupName</p>"

$status = if ($failed.Count -gt 0) { 'ATTENTION' } else { 'OK' }
$subject = "[$status] Nightly VM Shutdown - $($stopped.Count) deallocated"

$message = @{
    ContentSubject   = $subject
    ContentHtml      = $body
    ContentPlainText = "Shutdown completed at $stamp. " +
                       "Deallocated: $($stopped.Count). Failed: $($failed.Count)."
    SenderAddress    = $senderAddress
    RecipientTo      = @(@{ Address = $RecipientAddress; DisplayName = 'Cloud Ops' })
}

try {
    Send-AzEmailServicedataEmail -Message $message -Endpoint $acsEndpoint | Out-Null
    Write-Output 'Summary email queued.'
}
catch {
    Write-Error "Shutdown succeeded but email failed: $($_.Exception.Message)"
}

if ($failed.Count -gt 0) {
    throw "$($failed.Count) VM(s) failed to deallocate. See job output."
}
Two design decisions worth calling out. The email failure is caught but doesn’t re-throw — a broken mail relay shouldn’t make a successful shutdown look like a failed job. But a VM that wouldn’t stop does throw at the end, so the job shows as Failed in the portal and any alerting you’ve wired up actually fires.
Step 7 — Test Before You Schedule Anything
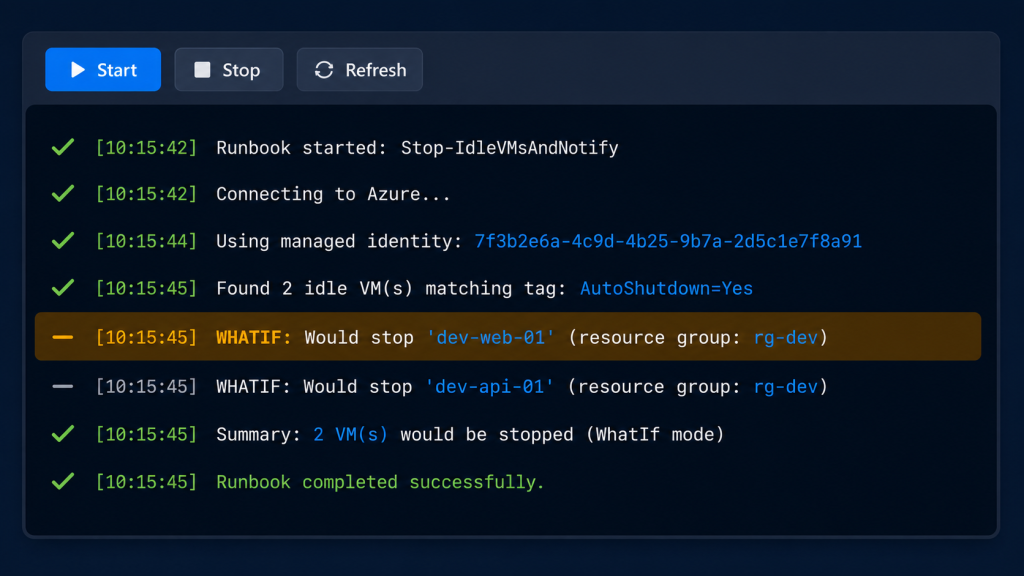
Portal. Open the runbook → Edit → Test pane. Set WhatIfOnly to true and click Start. You get the full inventory and zero side effects. Read every VM name in that output.
Happy? Run it again with WhatIfOnly set to false — during business hours, on purpose, watching. Confirm the VMs show Stopped (deallocated), not just Stopped, and confirm the email lands. Then close the test pane and click Publish.
PowerShell.
$job = Start-AzAutomationRunbook -ResourceGroupName 'acs-eng-test-eastus-rg' `
    -AutomationAccountName 'aa-vmops-eng-test-eastus' `
    -Name 'Stop-TaggedVMs' `
    -Parameters @{ WhatIfOnly = $true } -MaxWaitSeconds 300 -Wait

Publish-AzAutomationRunbook -ResourceGroupName 'acs-eng-test-eastus-rg' `
    -AutomationAccountName 'aa-vmops-eng-test-eastus' `
    -Name 'Stop-TaggedVMs'
Don’t skip that publish. A runbook has a draft version and a published version, and the schedule runs the published one. Editing without republishing is the classic “my fix didn’t take” bug.
Step 8 — Create and Link the Schedule
Portal. Shared Resources → Schedules → Add a schedule. Name it Nightly-VM-Shutdown-0000-ET, set Starts to tomorrow at 12:00 AM, set Time zone to (UTC-05:00) Eastern Time (US & Canada), choose Recurring, recur every 1 Day. Create.
Then go to Runbooks → Stop-TaggedVMs → Schedules → Add a schedule → Link a schedule to your runbook, and pick the one you just made. If the runbook has parameters you want overridden, set them here.
PowerShell.
$params = @{
    ResourceGroupName     = 'acs-eng-test-eastus-rg'
    AutomationAccountName = 'aa-vmops-eng-test-eastus'
}

New-AzAutomationSchedule @params `
    -Name 'Nightly-VM-Shutdown-0000-ET' `
    -StartTime (Get-Date).Date.AddDays(1) `
    -TimeZone 'Eastern Standard Time' `
    -DayInterval 1 `
    -Description 'Nightly tagged-VM shutdown, 12:00 AM Eastern.'

Register-AzAutomationScheduledRunbook @params `
    -RunbookName 'Stop-TaggedVMs' `
    -ScheduleName 'Nightly-VM-Shutdown-0000-ET'
Azure CLI.
az automation schedule create \
  --resource-group acs-eng-test-eastus-rg \
  --automation-account-name aa-vmops-eng-test-eastus \
  --name Nightly-VM-Shutdown-0000-ET \
  --frequency Day --interval 1 \
  --start-time "2026-08-11 00:00:00" \
  --time-zone "Eastern Standard Time"
Eastern Standard Time is the Windows time zone ID, and despite the name it covers EDT too — Azure handles the seasonal transition. Never substitute a UTC offset; it drifts by an hour twice a year.
One thing to know now rather than later: you can’t change a schedule’s start time after you create it. Set-AzAutomationSchedule and az automation schedule update both accept only description and enabled state. Moving the time means creating a new schedule and relinking. Get it right the first time, or read the companion post on doing that migration cleanly.
Step 9 — Verify
Portal. Open the schedule and confirm Next run reads tomorrow at midnight Eastern. Open the runbook’s Schedules tab and confirm the link is there. Check Jobs the next morning for one Completed job at the right time.
PowerShell.
Get-AzAutomationSchedule @params -Name 'Nightly-VM-Shutdown-0000-ET' |
    Select-Object Name, NextRun, TimeZone, IsEnabled

Get-AzAutomationScheduledRunbook @params |
    Select-Object RunbookName, ScheduleName

Get-AzAutomationJob @params -RunbookName 'Stop-TaggedVMs' |
    Select-Object -First 5 JobId, Status, StartTime, EndTime
Don’t Rely on the Email Alone
The summary email is for humans. It is not monitoring.
Think about the failure that actually hurts: the runbook throws before it reaches the email code — bad credential, module import failure, ARM throttling — and no email arrives at all. An absent email looks exactly like an inbox you haven’t checked yet. That’s how a shutdown quietly stops running for six weeks.
Portal. Automation Account → Monitoring → Alerts → Create alert rule. For Signal name choose Total Jobs, add a dimension filter on Status equals Failed, set the threshold to greater than 0 over a 1-hour window, attach an action group, and create.
PowerShell.
$aaId = (Get-AzAutomationAccount `
    -ResourceGroupName 'acs-eng-test-eastus-rg' `
    -Name 'aa-vmops-eng-test-eastus').AutomationAccountId

$criteria = New-AzMetricAlertRuleV2Criteria `
    -MetricName 'TotalJob' `
    -DimensionSelection (New-AzMetricAlertRuleV2DimensionSelection `
        -DimensionName 'Status' -ValuesToInclude 'Failed') `
    -TimeAggregation Total -Operator GreaterThan -Threshold 0

Add-AzMetricAlertRuleV2 -Name 'vmops-runbook-failed' `
    -ResourceGroupName 'acs-eng-test-eastus-rg' `
    -WindowSize 01:00:00 -Frequency 00:05:00 `
    -TargetResourceId $aaId -Condition $criteria -Severity 2 `
    -ActionGroupId '<your-action-group-resource-id>'
Better still, add a second alert for absence — a log query that fires if no job has completed in the last 26 hours. Alerting on silence is what catches a disabled schedule, and it’s the check almost nobody builds until after it bites them.
When It Doesn’t Work
A short field guide to the failures you’ll actually hit.
“Run Login-AzAccount to login.” The managed identity isn’t enabled, or Connect-AzAccount -Identity is missing. Check the Automation Account’s Identity blade shows a principal ID.
AuthorizationFailed on Stop-AzVM. The role assignment hasn’t propagated — give it five minutes — or it’s scoped to the wrong resource group. Verify with Get-AzRoleAssignment -ObjectId $principalId.
“The term ‘Send-AzEmailServicedataEmail’ is not recognized.” Az.Communication wasn’t added to the Runtime Environment. Back to Step 5. This is the single most common failure in this build.
DomainNotLinked, or a 401 on send. Either the domain isn’t connected to the Communication Service resource (Step 4, item 4), or the identity is missing the ACS role assignment. The error text points at the wrong one about half the time.
VMs show Stopped but the bill doesn’t move. You used powerOff semantics somewhere, or something is restarting them. Stop-AzVM -Force deallocates by default; Stop-AzVM -StayProvisioned does not.
The job ran but nothing was tagged. Get-AzVM -Status returns tags, but tag keys are case-sensitive in the comparison above. autoshutdown won’t match AutoShutdown.
What This Actually Saves
A Standard_D4s_v5 in East US runs somewhere around $0.19/hour. Shutting it down from midnight to 7 AM on weekdays plus all weekend is roughly 83 hours a week off the meter — call it $16 a week, $820 a year, for one VM.
Ten VMs and you’ve paid for the afternoon you spent on this roughly forty times over. And unlike most cost-optimization work, this one keeps saving without anyone thinking about it again.
Set expectations honestly, though, because someone will check your math against the invoice. Deallocation stops the compute meter only. You keep paying for:
- Managed disks. A 128 GB Premium SSD runs about $19/month whether the VM is on or off.
- Static public IPs. Roughly $3.60/month each, billed continuously.
- Reserved Instances and savings plans. You’ve prepaid that capacity. Shutting the VM down saves you nothing — in fact it wastes the commitment. Never put an RI-covered VM in the shutdown group.
So the realistic pitch to your finance partner is “we cut compute hours by about half on dev/test,” not “we cut the Azure bill in half.” Overselling this is how good automation gets a bad reputation.
The Automation Account itself is effectively free at this scale — the first 500 job minutes each month are included, and a nightly runbook against a dozen VMs uses maybe 20.
Coming Up in Part 2
Same solution, zero PowerShell. We’ll build it as an Azure Logic App — Recurrence trigger, managed identity, Resource Manager actions to find and deallocate tagged VMs, and an Office 365 notification — with a full designer walkthrough and a scripted deployment path, then compare the two head to head on cost, maintainability, error handling, and who on your team can actually support it at 2 AM.
Spoiler: the answer isn’t the same for every shop, and it isn’t always the one you’d guess.