

You set up ACS Email, sent a test message, and it worked. Great. But here’s the uncomfortable truth: your emails are one inbox provider update away from landing in spam.
Google and Yahoo started enforcing sender authentication for bulk senders in February 2024. Microsoft followed in early 2025. As of 2026, enforcement is strict across all major providers – noncompliant messages get rejected at the SMTP level. The three protocols that determine whether your email gets delivered or dumped are SPF, DKIM, and DMARC.
The good news: ACS handles most of the heavy lifting. But you still need to understand what these records do, how they interact, and where things go wrong – because when a client calls saying “our emails are going to spam,” DNS is almost always the answer.
The Three Protocols: What They Do and Why You Need All Three
Think of email authentication like a three-part security check at an airport. SPF is the passenger list (who’s allowed to fly). DKIM is the TSA lock on your luggage (proving only the TSA looked in your bag). DMARC is the security officer who checks both and decides what happens when something doesn’t match.
Each one solves a different problem, and you need all three working together.
SPF: The Passenger List
What it does: SPF (Sender Policy Framework) tells receiving mail servers which IP addresses and services are authorized to send email on behalf of your domain. When an email arrives, the receiving server checks the envelope sender (Return-Path) against your SPF record. If the sending server isn’t on the list,
SPF fails.
The ACS SPF record looks like this:
|
v=spf1 include:spf.protection.outlook.com -all |
Let’s break it down:
• v=spf1 – declares this is an SPF record (version 1)
• include:spf.protection.outlook.com – authorizes Microsoft’s email infrastructure (which ACS routes through) to send on your behalf
• -all – hard fail. Any server NOT in this list is explicitly unauthorized. Use -all (hard fail) in production, not ~all (soft fail)
|
The SPF Merge Problem If your domain already sends email through Microsoft 365, you already have an SPF record. You cannot have two SPF records on the same domain – this violates RFC 7208 and causes both to fail. Instead, you need to merge the ACS include directive into your existing record. For example, if your current SPF record is: v=spf1 include:spf.protection.outlook.com -all …then you’re already set because ACS uses the same include. If you have additional services like Mailchimp or SendGrid, your merged record might look like: v=spf1 include:spf.protection.outlook.com include:servers.mcsv.net -all |
|
SPF Lookup Limit SPF has a hard cap of 10 DNS lookups per RFC 7208. Each include mechanism triggers a lookup, and nested includes count too. If your SPF record exceeds 10 lookups, the |

DKIM: The TSA Lock
What it does: DKIM (DomainKeys Identified Mail) cryptographically signs your outgoing email. The sending server attaches a digital signature to the message header using a private key. The receiving server retrieves the corresponding public key from your DNS and verifies the signature. If the message was altered in transit, the signature check fails.
DKIM doesn’t prevent spoofing by itself – it proves the message wasn’t tampered with after it was sent, and it proves the domain that signed the message is the domain it claims to be.
ACS uses two DKIM selectors (selector1 and selector2), which allows Microsoft to rotate DKIM keys on the backend without requiring you to update your DNS records. You set up CNAME records that point to Microsoft’s key servers, and they handle the rest.
The ACS DKIM records:
|
Type |
Name |
Value |
TTL |
|
CNAME |
selector1-azurecomm-prod-net._domainkey |
selector1-azurecomm-prod-net._domainkey.azurecomm.net |
3600 |
|
CNAME |
selector2-azurecomm-prod-net._domainkey |
selector2-azurecomm-prod-net._domainkey.azurecomm.net |
3600 |
|
ACS DKIM Selectors Are Different from Exchange Online If you’re used to Exchange Online DKIM, note that ACS uses different selector names. Exchange Online uses selector1._domainkey and selector2._domainkey. ACS uses selector1-azurecomm-prod-net._domainkey and selector2-azurecomm-prod-net._domainkey. These are completely separate and don’t conflict – you can have both sets of DKIM records active simultaneously for the same domain. In fact, you must if you’re using both Exchange Online and ACS. |
A common gotcha with DKIM: if you’re using Cloudflare for DNS, make sure the proxy status for these CNAME records is set to DNS Only (gray cloud), not Proxied (orange cloud). Cloudflare’s proxy intercepts CNAME resolution and will break DKIM verification.

DMARC: The Policy Enforcer
What it does: DMARC (Domain-based Message Authentication, Reporting, and Conformance) ties SPF and DKIM together and tells receiving servers what to do when authentication fails. It also provides a reporting mechanism so you can see who’s sending email as your domain – legitimate or otherwise.
DMARC checks for alignment – meaning the domain in the From: header must match the domain that passed SPF or DKIM. This is the protocol that actually prevents spoofing, because a spoofed email might pass SPF (using a different Return-Path domain) but fail DMARC alignment.
A basic DMARC record:
|
v=DMARC1; p=reject; |
Breaking it down:
• v=DMARC1 – declares this is a DMARC record
• p=reject – policy: reject messages that fail authentication (strongest enforcement)
• rua=mailto:… – aggregate report destination. You’ll receive daily XML reports showing who’s sending as your domain
• pct=100 – apply the policy to 100% of messages
|
DMARC Rollout: Don’t Jump Straight to Reject If you’re adding DMARC for the first time, start with p=none for 2-4 weeks to collect reports without affecting delivery. This lets you identify legitimate services sending as |

The Complete DNS Setup for ACS Email
Here are all the DNS records you need for a fully authenticated ACS Email deployment. We’ll walk through adding each one.
Domain Verification TXT Record
This proves you own the domain. Azure generates a unique verification code when you add your domain to the Email Communication Service.
|
Type |
Name |
Value |
TTL |
|
TXT |
@ |
ms-domain-verification=<your-unique-code> |
3600 |
|
Merging with Existing TXT Records If you already have TXT records on your domain root (common for M365, Stripe verification, etc.), you add the ACS verification value as an additional TXT record on the same name, not a replacement. Your DNS provider should allow multiple TXT records on the @ record. Our Deploy-ACSEmail.ps1 script handles this automatically – it appends the value to existing TXT records without overwriting. |
SPF TXT Record
|
Type |
Name |
Value |
TTL |
|
TXT |
@ |
v=spf1 include:spf.protection.outlook.com -all |
3600 |
If you already have an SPF record for M365, you’re likely already set. If you have additional services, merge them into a single record. Remember: only one SPF record per domain.
DKIM CNAME Records
|
Type |
Name |
Value |
TTL |
|
CNAME |
selector1-azurecomm-prod-net._domainkey |
selector1-azurecomm-prod-net._domainkey.azurecomm.net |
3600 |
|
CNAME |
selector2-azurecomm-prod-net._domainkey |
selector2-azurecomm-prod-net._domainkey.azurecomm.net |
3600 |
These CNAME records delegate DKIM key management to Microsoft. When ACS signs an email, the receiving server follows these CNAMEs to retrieve the public key and verify the signature.
DMARC TXT Record
|
Type |
Name |
Value |
TTL |
|
TXT |
_dmarc |
v=DMARC1; p=reject; rua=mailto:dm***@*****************re.com” title=”This contact has been encoded by Anti-Spam by CleanTalk. Click to decode. To finish the decoding make sure that JavaScript is enabled in your browser.” data-original-string=”wyqjHMFRaj3uKH2OIeD6rw==c71rGcPVHrhTqxEyoe/l1mbSCd6M+I2StUp5xcOqJgKB+E= |
3600 |
Note that DMARC records go on the _dmarc subdomain, not the root. ACS doesn’t create this for you – it’s your responsibility because DMARC is a domain-wide policy that affects all email senders, not just ACS.
The Subdomain Strategy: Should You Use One?
A question I get from almost every client: should we use our root domain (somedomainsomewhere.com) or a subdomain (notify.somedomainsomewhere.com) for ACS Email?
The case for subdomains:
• Isolates ACS email reputation from your primary domain
• If something goes wrong with automated email (misconfigured scanner, runaway script), your main domain’s deliverability is protected
• Allows separate DMARC policies for transactional vs. user email
• Makes it clear in email headers that the message is system-generated
The case for root domain:
• Simpler setup – no additional DNS zone management
• Emails look more professional (sc*****@*****************re.com vs. sc*****@************************re.com)
• Existing SPF records for M365 often cover ACS already
My recommendation: For most clients, use the root domain for ACS Email. The reputation isolation benefit of subdomains is real, but transactional email from ACS (scan-to-email, alerts, notifications) is low-volume and low-risk. The simplicity of the root domain almost always wins. Reserve subdomain isolation for high-volume marketing or bulk email scenarios.
|
Subdomain DNS Considerations If you do use a subdomain, remember that your DNS records need to be relative to the subdomain’s zone. For example, if your subdomain is notify.somedomainsomewhere.com and your DNS zone is somedomainsomewhere.com, your DKIM CNAME names become selector1-azurecomm-prod-net._domainkey.notify (not just selector1-azurecomm-prod-net._domainkey). Our Deploy-ACSEmail.ps1 script handles this calculation automatically with the -DnsZoneName parameter. |
Verifying Your DNS Configuration
After adding all your DNS records, you need to verify them both in the Azure Portal and independently using other DNS tools such as NSLOOKUP. Here’s how.
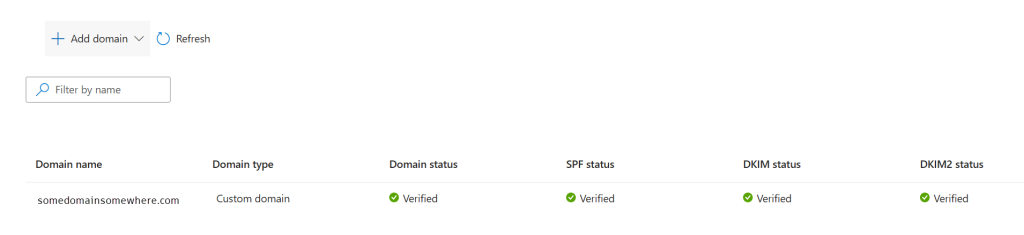
Azure Portal Verification
• Open your Email Communication Service
• Click Provision Domains
• Click on your domain name
• Click Verify for each record type: Domain, SPF, DKIM, DKIM2
|
Portal Verification Gotcha The Azure CLI initiate-verification command doesn’t always trigger verification reliably. Even if you’ve initiated verification via PowerShell or CLI, you may need to click Verify in the Portal to complete the process. Also note that verification happens on the Email Communication Service (Provision Domains), not on the Communication Service (Domains). This is the most common navigation confusion in ACS. |
Independent DNS Verification
Don’t rely solely on the Azure Portal. Use these commands to verify your records from any machine:
|
# Verify domain ownership TXT record nslookup -q=TXT somedomainsomewhere.com
# Verify SPF record nslookup -q=TXT somedomainsomewhere.com # Look for: v=spf1 include:spf.protection.outlook.com -all
# Verify DKIM CNAME records nslookup -q=CNAME selector1-azurecomm-prod-net._domainkey.somedomainsomewhere.com nslookup -q=CNAME selector2-azurecomm-prod-net._domainkey.somedomainsomewhere.com
# Verify DMARC record nslookup -q=TXT _dmarc.somedomainsomewhere.com |
You can also use online tools like MXToolbox (mxtoolbox.com) for a comprehensive check that includes SPF lookup count validation and DMARC policy analysis.
Troubleshooting DNS Issues
SPF: “Too Many DNS Lookups”
Each include, a, mx, and redirect mechanism in your SPF record triggers a DNS lookup. The limit is 10. If you exceed it, your entire SPF record becomes invalid. Common solutions:
• Remove unnecessary include directives for services you no longer use
• Use ip4: or ip6: directives for static IPs instead of includes (these don’t count toward the lookup limit)
• Consider an SPF flattening service for complex multi-service environments
DKIM: “Verification Pending” After 24+ Hours
• Verify the CNAME records resolve correctly with nslookup
• If using Cloudflare, ensure proxy status is DNS Only (gray cloud)
• Check for typos in the selector names – they’re long and easy to mistype
• Some DNS providers add the domain automatically – don’t enter selector1-azurecomm-prod-net._domainkey.somedomainsomewhere.com if your provider appends .somedomainsomewhere.com to the name field already
DMARC: Emails Landing in Spam Despite SPF/DKIM Passing
This is usually an alignment issue. DMARC requires that either SPF or DKIM aligns with the From: header domain. Check:
• Is the From: address using your domain? (Not a generic Azure subdomain)
• Is the Return-Path domain matching your From: domain? (SPF alignment)
• Is the DKIM signature domain matching your From: domain? (DKIM alignment)
Use email header analysis tools (like Google’s Messageheader or MXToolbox Header Analyzer) to inspect the authentication results on a received message.
Automating DNS with the ACS Email Toolkit
If you manage ACS Email deployments for multiple clients, manually adding DNS records gets old fast. Our open-source ACS Email Toolkit automates DNS record creation when your domains are hosted in Azure DNS.
The Deploy-ACSEmail.ps1 script’s DNS automation:
• TXT records: Appends the verification value to existing TXT record sets without overwriting (safe for domains with existing M365 or Stripe verifications)
• SPF merging: Detects existing SPF records and intelligently merges the ACS include directive before the -all qualifier. Existing SPF values are preserved
• DKIM CNAMEs: Creates both CNAME records with duplicate detection (skips if they already exist)
• Subdomain-aware: Calculates relative record names when using subdomains with a root DNS zone
|
# Automated DNS setup with Deploy-ACSEmail.ps1 .\Deploy-ACSEmail.ps1 ` -ResourceGroupName “rg-acs-email-prod” ` -EmailServiceName “acs-email-somedomainsomewhere-prod” ` -CommunicationServiceName “acs-somedomainsomewhere” ` -CustomDomainName “somedomainsomewhere.com” ` -DnsZoneResourceGroupName “rg-dns-prod” ` -MailFromAddresses @(“donotreply”, “scanner”) ` -MailFromDisplayNames @(“Do Not Reply”, “Scanner”) |
The script creates all four DNS record types, initiates verification, polls for up to 3 minutes, and if verification completes, automatically continues to Entra app creation and SMTP username setup. If DNS propagation is slow, it stops cleanly and provides the exact command to run after you complete Portal verification manually.
The Bottom Line
DNS configuration is the difference between “email sent” and “email delivered.” SPF authorizes your sending servers, DKIM proves your messages haven’t been tampered with, and DMARC ties them together with a policy that tells receiving servers what to do when things don’t match.
For ACS Email, the DNS setup is straightforward: one TXT record for domain verification, one SPF record (usually already in place for M365), two DKIM CNAME records, and a DMARC TXT record. Get all four verified in the Portal, and your emails will pass authentication checks at every major inbox provider.
The key takeaways: never have two SPF records on the same domain, watch your SPF lookup count, use -all (hard fail) in production, start DMARC at p=none and work up to p=reject, and verify independently with nslookup or another tool instead of relying solely on the Portal.
Up Next in This Series
In Part 4, we’ll cover managing sender identities and real-world automation patterns – dedicated Entra apps per use case, multi-domain setups for LLCs with DBAs, secret rotation procedures, and building a scalable ACS Email architecture that grows with your organization.
Need help configuring DNS for your ACS Email deployment? Contact Azure Innovators – we handle DNS configuration, email authentication, and deliverability optimization for organizations of all sizes.